'%20style='fill:%20rgb(104,%20183,%20176);%20fill-opacity:%201;'%20class='fills'/%3e%3c/svg%3e)
'%20style='fill:%20rgb(93,%20127,%20229);%20fill-opacity:%201;'%20class='fills'/%3e%3c/svg%3e)
'%20filter='url(%23a)'%20style='fill:%20rgb(245,%2079,%2079);%20fill-opacity:%201;'%20class='fills'/%3e%3c/svg%3e)


Anki is a flashcard app that you can use to remember vocabulary and facts. It's also an insanely powerful tool that gives you lots of options to customize it. I like Anki, and I particularly like customizing it.
Flashcards in Anki are like tiny webpages with JavaScript, styles and everything, which allows you to do some very advanced things on them. The thing is, programming with Anki comes with some rather unique caveats that can make it kind of difficult. For example, what works in Anki Desktop may not work on AnkiDroid, and it can be difficult to load or look up data if your cards are supposed to work offline.
This is the first of a series of blog posts, where I explain the most important tricks and workarounds that I have used over the last few years to create and maintain advanced Anki cards for learning Chinese which are distributed over the Kartenaale group. It brings me tremendous joy to hear from somebody at University that they use my cards to learn every day, and even more so if these people also express an interest in how they actually work. This series is for everyone who has expressed that interest. I'll explain how by making you do all of the steps yourself (or imagining yourself doing them, if you prefer) to build something that comes very close to the actual Kartenaale cards. More concretely, by the end of the series, you will have created an extensive deck of animated Japanese Kanji, all made with your own fair hands. A bit of programming experience is certainly helpful to follow along, but I encourage you to try anyway if that isn't you. It's going to be weird, but not rocket science, you can do this!
Instead of doing everything yourself, you can also view the finished code on University of Vienna Gitlab. Not gonna lie, there's quite a bit of work ahead of us in this series, but I do hope it's going to be a fun ride and that there will be a few takeaways for you.
This first post explores the basics: it shows you how to safely experiment with code in Anki, create custom note types to fit your cards, and how to write code in a more convenient way outside of Anki using the parcel build tool. We will use this tool to bring HanziWriter into our cards for animated Kanji.
Let's create a space in Anki for you where you can experiment with code.
For testing cards, it often works best to keep your experiments separate from your actual learning Anki. This is easy to do with profiles. Let's add a new test profile. In Anki click on "File | Switch profile" in the menubar. Use the add button to add a new profile called "test":
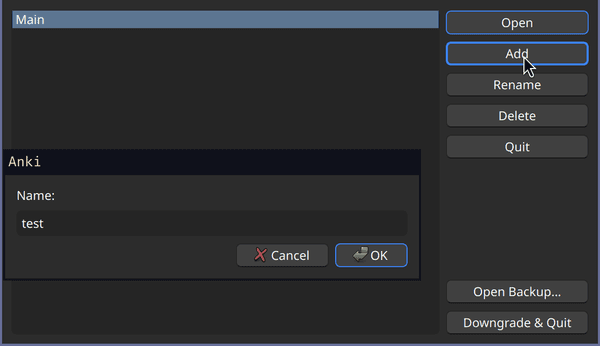 Creating an Anki profile for our experiments
By selecting the new profile and clicking "Open", we can now start with a clean slate. You can switch back to your learning Anki later using the same process.
The new profile looks like a fresh installation of Anki, perfect for testing:
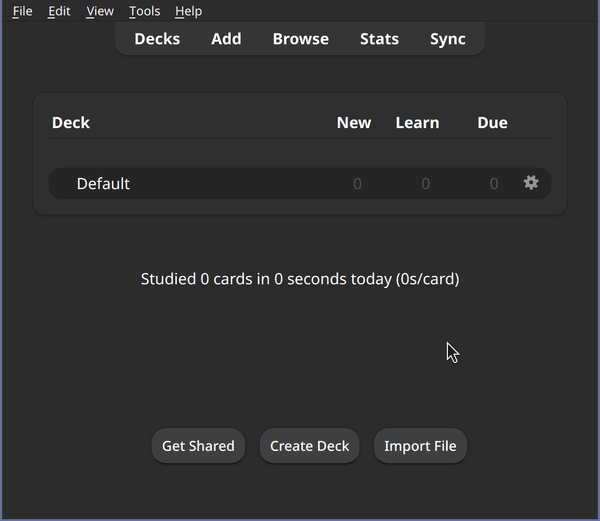 Our new test profile in Anki, ready for our experiments
Since no learning progress we would miss is stored here, we can consider the profile expendable. If we find that our experiment went wrong and we would like to start over, or if we plain don't need the profile anymore, we can delete it and start over. No data with emotional or practical value, no biggie. If we would do what we are going to do in our regular learning profile (usually "Main"), we would have to be much more careful in everything we do.
To add something for Japanese vocabulary into Anki, we first need some Anki terminology to make sure we are all talking about the same thing: When you add something new to learn to Anki, you don't add cards directly, but instead something that is called a note and of a specific note type. The note type, say, "Japanese vocabulary", defines a number of fields, like "English", "Japanese", etc., and a number of templates, for example one template for cards to translate English into Japanese and one for the reverse. Cards can be organized into sets called a deck, e.g. "Lesson 1", which you can select Anki's main interface to start a practice session. In the Anki python module, a note type is sometimes also referred to as a model.
To kick us off, let's create a note type "Japanese vocabulary". In the Anki menubar, select "Tools | Manage note types". In the Window that pops up, click "Add". In the window that pops up select "Clone: Basic" to start with something that has the "Front" and "Back" fields and a template already set up:
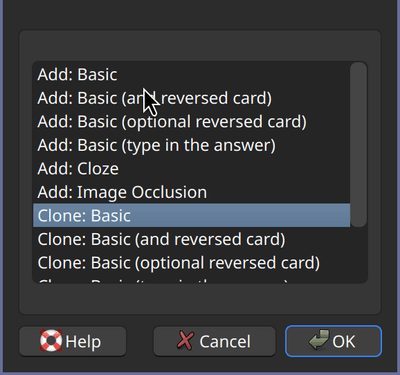 Starting a new note type from Basic
Hitting OK, yet another window appears where you can pick a new name for the new note type, for which we pick "Japanese vocabulary". Your new note type is ready now, you can close the window.
Let's add a note of that type too. Click "Add" in Anki and make sure that "Japanese vocabulary" is selected under "Type". Pick any deck you want for the card, just remember which one. You'll see that two fields "Front" and "Back" are already set up for you because we started from "Basic". Let's use English for "Front" and Kanji for "Back". Think of some vocabulary you want to remember or put "eel" into Front and "鰻" into Back and then click "Add" at the bottom:
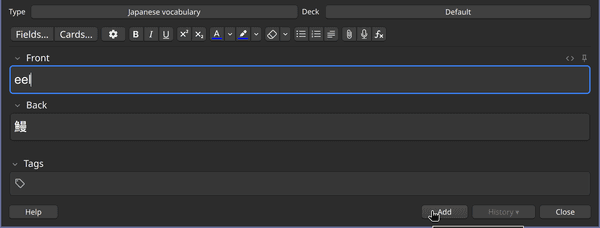 Adding unagi to the new note type
You now have both a card and a note and you are ready to start programming!
Let's add some code to the front side of "Japanese vocabulary" cards.
To do this, bring up the note types window again with "Tools | Manage note types",
select Japanese vocabulary and then click "Cards". This dubiously named button
brings up a nice window to edit the Templates of cards. The templates describe
how a card looks like, and where to put the values of fields like "Front", by
writing down a placeholder like {{Front}} or {{Back}}.
The text area that currently contains just {{Front}} can contain not just
text but any HTML, including JavaScript.
To illustrate this, let's add some JavaScript to paint the card red. Try adding
this below or above {{Front}}:
<script>document.body.style.background = 'red'</script>
Indeed, the card now shows up in an intense red:
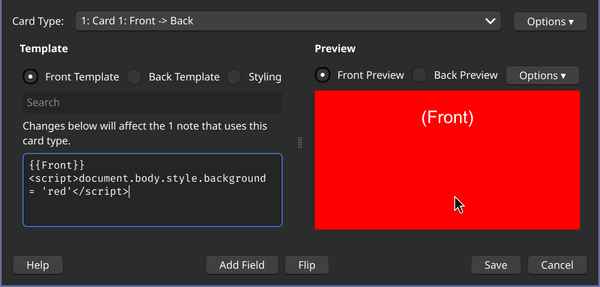 We painted a card red with JavaScript
This should already get you going for simple scripting projects, but for anything more complex you can already see the limitations of the basic approach of typing into the textbox:
Let's explore options for developing your code outside Anki in the next section.
Anki's built-in editor is nice and everything, but if you have done coding for the web before, you would probably like it better to use files instead of a text box, and to view and edit these files in your favorite editor or IDE. In this section we explore how to work with files and transform them into something that can be put back into Anki.
By the end of this section, our cards will finally be animated.
When working with files in the simplest mode, you can use a .html file for every template, use only inline scripts, and copy/paste that file verbatim back into Anki to use and test it.
A step up for organizing your code would be to put your scripts into separate .js files that get loaded with import "your.script.js" or the src attribute of <script>, allowing you to share some code. Unfortunately this cannot just be pasted back into Anki because Anki won't be able to find what you import or put into the src attribute. Sure, you can host your scripts somewhere on the internet and use src on your scripts for Anki to find it, but I wouldn't recommend that approach because then your cards won't work offline. Instead, I recommend using a build tool to fold your .js files you reference into your HTML as inline scripts, the end result being just like in the first example where we painted the card red without any external script file. The same goes for external dependencies from npm: you want the code in the HTML, not in an external file from the internet.
Changing files into inline script tags manually would be some really boring work, so I highly recommend to automate this step of merging of HTML and scripts. I used the parcel build system for this task because it was popular at the time when I started and because it is simple to set up. Instead of parcel you could also look into the more modern Vite or web build tools in general, maybe static website generators could also work for your use case. Let's try out parcel together as an example.
First, you need node.js installed to be able to install and run parcel. If you
don't have node already, the official website
gives a few options to install it. Once installed, you should be able to run
npm commands (the node package manager).
Use your terminal (a.k.a shell, command line window) and cd to a directory where you want to keep your code, then initialize it with a package.json by running npm init. Then, install the parcel build tool and something for animated Kanji (HanziWriter):
mkdir your-anki-experiments
cd your-anki-experiments
npm init
npm install --save-dev parcel parcel-transformer-anki-tags
npm install --save hanzi-writer
Next up, we add files for our code: front.html and back.html will be the code of the front and back side, respectively, and animation.js will contain our code.
Let's first set up the front side, which will show the "Front" field (English), nothing fancy. You can make it look something like this:
Translate to Kanji please:<br>
{{Front}}
The back side will include the {{FrontSide}} to repeat the question,
then show the Kanji. We will give the Kanji a class of kanji so
that we can use it from our script to read the Kanji and put an animation below
it. The script must be loaded
with import instead of src, then parcel will make sure it's all inline and
not in an extra file. Taken together, let's use this for back.html:
{{FrontSide}}

<hr id="answer">

<div class="kanji">{{Back}}</div>

<script type="module">
  import "./animation.js"
</script>
Now, to the interesting part. Let's write animation.js to use hanzi-writer
and show an animated Kanji for every class="kanji":
import HanziWriter from "hanzi-writer"

for (const kanjiContainer of document.getElementsByClassName("kanji")) {
  const kanjiText = kanjiContainer.textContent
  const hanziWriterContainer = document.createElement("div")
  kanjiContainer.append(hanziWriterContainer)
  HanziWriter.create(hanziWriterContainer, kanjiText).animateCharacter()
}
Parcel has a feature to pull out inline scripts into external files if they get too large.
We need to turn this off for HanziWriter to fit into the HTML. For this purpose, we can tweak parcel to allow for larger JavaScript to be embedded by picking a custom threshold in your package.json. Add the following to your package.json to make it work (don't forget the comma on the element before):
"@parcel/bundler-default": {
  "minBundles": 10000
}
Now all that's left to do is to ask parcel to generate HTML for us:
node_modules/.bin/parcel build front.html back.html
You'll see in the output that two files dist/front.html and dist/back.html
have been created.
Let's copy the contents of these files back into Anki (Front Template and
Back Template, respectively). back.html will be a pile of gibberish, but
perfectly readable to Anki. Let's save and test your template with the card
you created in the beginning. Show the back side, aaaand tada, animated Kanji:
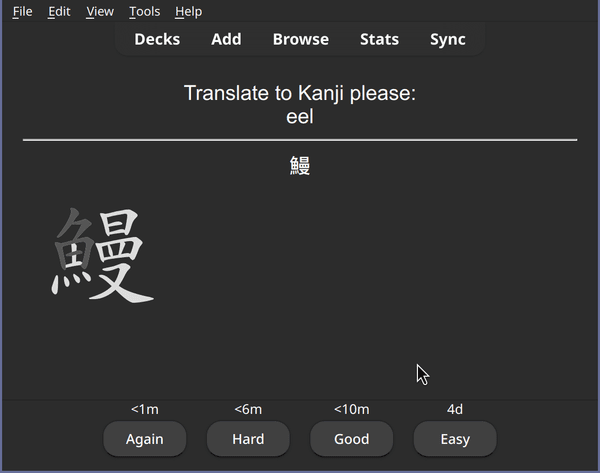 Animated Kanji with HanziWriter
In the last section, we needed a lot of steps until we could finally test in Anki.
It's usually more effective to first test in the browser before the full test
in Anki. Luckily, parcel gives us live preview features that we can combine
with a plugin parcel-transformer-anki-tags to fill in arbitrary values for
Anki tags during testing. Let's improve our setup so that we can test in the
browser.
First, we install the necessary transformer as an npm dev dependency:
npm install --save-dev parcel-transformer-anki-tags
Then, we create a parcel configuration for testing. Note that we don't want
to use this config in the build step. We only want a replacement for
{{Front}} in the browser to test things, not in Anki. Let's create a
parcel-dev.json with the Anki plugin enabled that we are just going to use
for testing:
{
  "extends": "@parcel/config-default",
  "transformers": {
    "*.html": [ "parcel-transformer-anki-tags", "..." ]
  }
}
The values to use for Anki tags can be specified in anki-tags.config.json.
For example to replace {{Front}} with sake, and
{{Back}} with 酒 provide the following anki-tags.config.json:
{
  "replacements": {
    "Front": "sake",
    "Back": "酒"
  }
}
Now all that's left to do is to start a live preview session with:
node_modules/.bin/parcel serve --config=./parcel-dev.json front.html back.html
Now bring up http://localhost:1234/back.html
in your web browser. You should see something that looks like the back of an
Anki card, with {{FrontSide}} replaced with the question part:
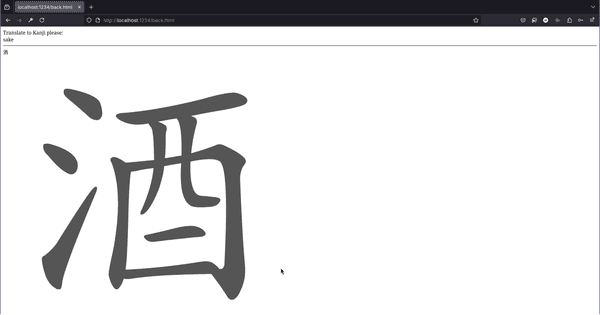 Live Preview of your card code in a web browser
Try swapping
out Front with something else in anki-tags.config.json. You'll see that the
browser will update without refreshing. Very convenient for testing compared to
testing everything right in Anki.
Once you are happy with your changes, copy them back into Anki the same way we
did before with node_modules/.bin/parcel build front.html back.html and no
extra config file. There are less tedious ways to bring your changes back into
Anki that we will cover in a future post.
If you had any problems following along, consider comparing what you have with the solution provided on University of Vienna Gitlab.
In this post you have learned to do some really advanced JavaScript on your Anki cards, by relying on the work of others with npm packages, and bundling your result as a HTML that you can paste back into Anki.
You have also learned to develop code for the cards outside of Anki with the
build tool parcel. You have also customized your live preview to work with
Anki tags, so that your changes can be tested without copying them back into
Anki immediately.
This already lets you do many quite advanced things, but it's also still a bit tedious. For one thing, you have to go back and forth between Anki and parcel and copy/paste stuff and see the result on a real card. Fear not, the next stop in our journey (in the next post) will be us exploring how to create note types with custom templates using python code to save us the copy/pasta. From there, the stuff we are going to do will become progressively more deranged with each post to get Anki to do advanced things reliably.
I hope you enjoyed this first post in the series and will be back for more in another post. Feel free to write me E-Mails and tell me about all the crazy stuff you do with Anki.
Then you're in luck, this post is part of the series Anki scripting crimes: Doing what you have to do for advanced scripting on Anki cards and you can continue reading straight away with Anki scripting crimes, part 2: Managing Anki templates with python code.
If you like the post or have thoughts on it, don't hesitate to write an E-Mail and tell me about it. You can reach me under philipp.pospischil@tapirbug.at.
Interested in more weird tech content? Check out all posts or check the home page.
Want to stay up-to-date? You can subscribe to this blog by adding the URL https://tapirbug.xyz to your favorite feed reader. Atom, RSS and JSON subscriptions are supported.