'%20style='fill:%20rgb(104,%20183,%20176);%20fill-opacity:%201;'%20class='fills'/%3e%3c/svg%3e)
'%20style='fill:%20rgb(93,%20127,%20229);%20fill-opacity:%201;'%20class='fills'/%3e%3c/svg%3e)
'%20filter='url(%23a)'%20style='fill:%20rgb(245,%2079,%2079);%20fill-opacity:%201;'%20class='fills'/%3e%3c/svg%3e)


Welcome back to the second of a series of blog posts on advanced scripting in Anki, a flashcard app that you can use to remember vocabulary and facts.
In the first post
Escape the text box and use npm dependencies on Anki cards
we have established a convenient place for ourselves where we can develop
code for cards outside of Anki in a testing project, with live reload,
a way to test different values for Anki tags like {{Front}} in the browser
without going back to Anki,
and all the npm dependencies we need included directly on the cards.
We also learned to, when the cards look good in the browser, build the code into
a set of standalone HTML files (front.html and back.html usually), which we
can then paste back into Anki to actually use our code for learning.
This already gives us a lot of options, but it's also a bit tedious, especially if you have a lot of different templates. Right now, every template needs a separate copy/paste action from us. For more advanced cards, where we have 10 cards for each note, each with its own template, this means 20 times copy/paste. Is this really necessary?
No, not if you use Anki's python package. In this second blog post of the series, we will learn to create Anki packages (APKGs) from python code, with our custom templates set in code.
As was the case last time, you can follow along on your computer, or view the final source code on University of Vienna Gitlab.
If you have read and followed along on the first post, you can continue with the same code. If you have not, consider checking out the solution of the last post and starting from there.
Instead of actually clicking and pasting, the state of an Anki collection can also be read and modified with Ankis comprehensive python package, which also has some official documentation.
The package lets you load an Anki collection, manage note types (with templates!), add decks and cards, and many other things. Basically, everything that you can click, you can also do with the python package, and more. In this post we will use it to import and export data in the form of APKGs, to modify templates, and to create entirely new note types from python code.
To manage templates, we have three basic options:
We are not going to cover the open heart surgery approach. It takes the least clicking, but comes with significant drawbacks:
Instead we will first try the simpler approach of working with a reference APKG, and then proceed to creating an APKG without a reference.
Working with a reference APKG is especially useful if you have vocabulary in Anki, and just want to update a lot of templates for this vocabulary without too much clicking.
Creating an APKG without a reference is a bit more involved, but allows you to create entirely new note types from code and manage of all aspects of them. This is especially useful if you not only want to create templates from code, but also data like notes, or when applying advanced techniques were you need templates and data to match in some way.
To be able to see if we successfully changed the templates in the APKGs we
generate, we first need some changes that we can apply.
For example, you can an additional horizontal line with <hr>, or you can
get creative.
You can use parcel to test your ideas in your browser:
npm install # if you havn't already (this installs parcel to node_modules)
node_modules/.bin/parcel serve --config=./parcel-dev.json front.html back.html
Then, with your changes to the templates in place, generate new
dist/front.html and dist/back.html for the finished HTML
of back and front side, respectively:
node_modules/.bin/parcel build front.html back.html
Before we can start coding, we need something to work with: a reference APKG with a note type to try the approach of modifying a reference, and, critically, somewhere to put our python code, with the anki package set up so we can use it. Let's get started.
One of the approaches we are going to try requires a reference file with a card of the note type we want to modify.
Let's use the Japanese vocabulary note type from the last post. To export a note type, we also need to export a card, so let's create an APKG in Anki from the eel card.
Make sure the card is in its own deck (otherwise just create a new card in a new deck), then in Anki's main window click the cogwheel and select "Export…". Use the default format of "Anki Deck Package" and select support for older Anki versions. The rest can be left at default values:
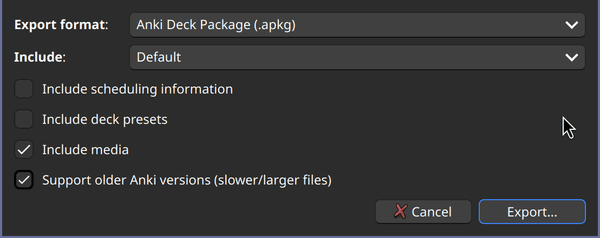 Exporting the reference APKG that contains the note type we want to modify
Save your APKG as reference.apkg to your code directory (or a clone of the solution of the last post).
First off, you are going to need python installed on your computer. There are
many helpful resources online to help you do this, for example the
Beginners Guide on the
official python wiki. When you're done, you should be able to run python and
pip on your command line.
Then, we need something to manage the anki package for us. This package
changes from time to time and may require that you change your code, so it's
helpful for stability if you work with a specific version of the anki
package. Ideally, you wouldn't choose a version at the system level, but make
a selection for each Anki code project you are working on. This is easy to do
with virtual environments in python, which are a way of running python code
with a specific version of packages that we need (just anki in our case, but
you may need more in the future).
There are many ways to manage virtual environments, and in this post we are
going to use a tool called pipenv. The idea is to have a file called the
Pipfile which (similar to package.json for JS) specifies the packages and
versions we need. Please refer to the
pipenv documentation to
install the tool (for example with pip install pipenv --user and then adding
the user site packages to your $PATH environment variable). After setup,
you should be able to run pipenv on your command line.
With everything set up on our computers, we can now proceed to creating a venv
with anki installed.
anki package installedLet's create a file Pipfile in the directory with our code that asks to
install a specific version of the anki package:
[[source]]
url = "https://pypi.org/simple"
verify_ssl = true
name = "pypi"

[packages]
anki = "==25.2"
Then, to create the venv from that file:
cd your-code-with-pipfile
pipenv install
Cool! Now if we want to run a python script wabbalabbadubdub.py with the
anki version we asked for, we can run
pipenv run python wabbalabbadubdub.py. You can also select the created venv
in many IDEs like Visual Studio Code (ctrl+shift+p: select interpreter) to get
auto-completion and inline documentation for the package.
And that's it with setup, we can now start coding.
Let's start with the simpler approach of loading the reference.apkg we
created previously and using python code to create a new one with modified
templates that can be imported back into Anki. Let's create a new file
create_from_reference.py to do that.
First, we need a collection to work with. Instead of using an existing
collection, we are
going to create a new one with the standard file ending of .anki2. If one
already exists from a previous run of our script, we delete it first:
from anki.collection import *
import os

try:
    # delete if exists already
    os.remove("temporary.anki2")
except OSError:
  pass
# then start fresh
col = Collection("temporary.anki2")
The new collection is like a fresh install or a new profile in Anki. It only
has a few basic note types and an empty "Default" deck set up, but not the
"Japanese vocabulary" that we want to change. To import the note type, we ask
Anki to import reference.apkg into the new collection for us:
from anki.import_export_pb2 import *

col.import_anki_package(ImportAnkiPackageRequest(
    # this is what you exported from Anki
    package_path="reference.apkg",
    # the options don't matter that much in our case
    # since the collection we import into is empty anyway
    options=ImportAnkiPackageOptions(
        merge_notetypes=True,
        update_notes=ImportAnkiPackageUpdateCondition.IMPORT_ANKI_PACKAGE_UPDATE_CONDITION_ALWAYS,
        update_notetypes=ImportAnkiPackageUpdateCondition.IMPORT_ANKI_PACKAGE_UPDATE_CONDITION_NEVER,
        with_scheduling=False,
        with_deck_configs=False,
    )
))
Next step is to find the ID of the note type we want to change. Let's use
something like this to set note_type_id_for_template_replacement with that
ID:
note_type_id_for_template_replacement = None
for note_type in col.models.all_names_and_ids():
  if note_type.name == "Japanese vocabulary":
    note_type_id_for_template_replacement = note_type.id
if note_type_id_for_template_replacement is None:
  raise Exception("Note type to modify templates of not found")
With the ID in hand, we can get a nested dictionary that fully describes the note type, including templates. In python code, note types are called "models":
note_type = col.models.get(note_type_id_for_template_replacement)
The top-level dictionary has an entry under the key "tmpls" with all the templates for the note type stored as dictionaries in a list. Usually, every template will create a card using the information of the note type. In our case there is just one entry because we only quiz the Kanji given "Front". Let's change the templates using the HTML we have built before by setting the "qfmt" and "afmt" fields of the nested dictionary to the HTML of front and back side, respectively:
with open("dist/front.html", "r") as front_file:
  with open("dist/back.html") as back_file:
    front_html = front_file.read()
    back_html = back_file.read()
note_type["tmpls"][0]["qfmt"] = front_html
note_type["tmpls"][0]["afmt"] = back_html
With our new modifications to note_type in place, the note type (or "model") is ready to be saved back into the collection with:
col.models.update_dict(note_type)
Cool, now the temporary collection contains the notes from our reference, but with new templates. All that's left is to write that to a file that can be imported to your (or anyone else's) Anki:
col.export_anki_package(
    # anki fails if this is just an apkg filename without a dir,
    # with ./ it's fine
    out_path="./cool_new_template.apkg",
    options=ExportAnkiPackageOptions(
        with_deck_configs=False,
        with_media=True,
        with_scheduling=False,
        legacy=True,
    ),
    limit=None)
Let's run to see if it worked:
pipenv run python create_from_reference.py
You should now see a new APKG in your code directory, named
cool_new_template.apkg. It should contain the new template, but did it work?
Let's find out. Open up Anki again and select "File | Import…" in the menu bar, selecting cool_new_template.apkg in the file dialog. In the import settings make sure to enable the setting to merge note types:
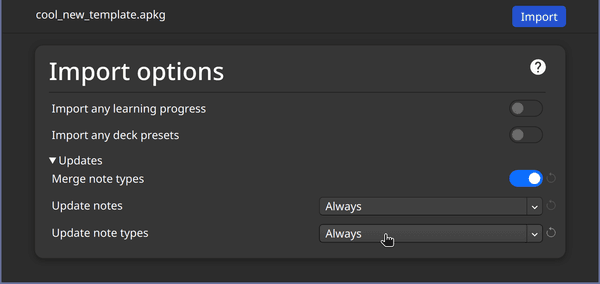 Importing the APKG created by our script and allowing it to change the note type in Anki
Click on the deck to start a practice session and it should now include your updated template:
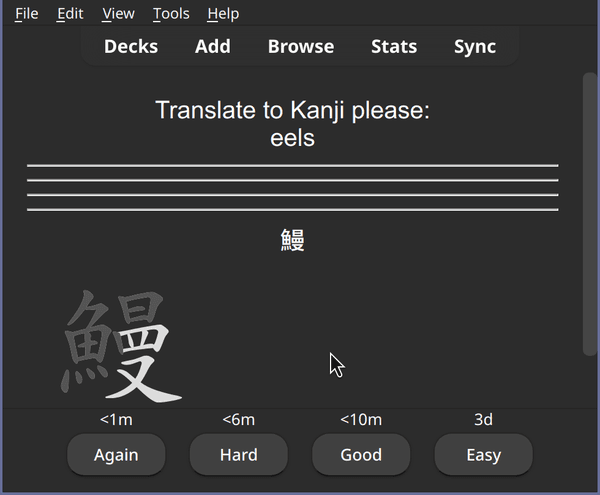 The templates now include the dashes without manually changing the note type in Anki
It worked! And you can naturally expand this approach to any number of templates. So if your notes should create 10 cards, you now have a way to update all 10 templates in one go from a script. You are not limited to just working with note types either. You can also create vocabulary in code, and include that in your APKG. We'll explore creating vocabulary in more detail in a future post.
Reading the last two sections, you may have asked yourself: do I really need an exported APKG for the note type at all, can't I just create the note type from scratch in code, add data from some source like a CSV, export an APKG, with no input APKG from Anki needed?
Well, yes, it's actually fairly easy to add a note type from python, but the catch is that when you create a note type, no matter how you choose to name it, Anki will pick a unique ID for the note type based on (or rather exactly equal to) the current time when you created it, so what you do in your script is not reproducible. If you run the script again, and import into Anki, the notes will be treated as completely separate from the ones you already have from a last import, because their note type has a different ID.
There is no obvious way built into the anki package to pick a predictable ID manually, so that importing again later would update the templates from before. If your script creates note types from scratch and you run your script again at a later point in time and create a new APKG and import it into an Anki that had the old version, then the note type from your last import and the new note type from this import are different by ID, and consequently the notes from the last import will not be updated with the new template and any notes you created manually in Anki and not from the script will still have the old note type. Working around this is possible in Anki by merging the note types manually every time you do an import, but that's a bit tedious. So do we just have to live with having an APKG that's just there for an ID where we will change most of the templates anyway? Actually, no. There is an offical API to pick a custom ID and I already told you what it is. Sort of official. If you squint a little.
It's the time of creation, and that alone that determines the note type ID. Consequently, all you have to do is to change your computer's clock to some time of your choosing, and to then keep it in place while your script is doing its work of creating a note type. If you do that, the ID is perfectly predictable and if you later import the APKG your script produces into your normal Anki, then this Anki will acknowledge that the note type it just imported and the one it already has from a previous run of the script, are, in fact, the same thing, despite actually having been created twice at two different points in time.
An easy way to fake a time for your script is to use something like libfaketime which works by intercepting library calls and instead of querying the time from the operating system, giving a fake value. As far as I know, this only works on Linux and Mac OS (or similar operating systems), but there probably are ways to achieve something like this on Windows and other operating systems too. I'll describe the approach using libfaketime, and you can follow
along if you use an operating system that supports it (or with a VM), or if you
have found a tool that does something similar for your OS.
To add the python package to our venv, we are going to add it to our Pipfile, by adding this line after the anki dependency:
libfaketime = "==3.0.0"
Then you can install the dependencies again from your shell:
pipenv install
Let's start a new script create_from_scratch.py together that begins with
some boilerplate code that will allow us to change the time later.
from libfaketime import fake_time, reexec_if_needed

reexec_if_needed() # setup for faking the time later, which may require a restart
Then, we create a temporary collection again, same as before:
from anki.collection import *

try:
    os.remove("temporary.anki2")
except OSError:
  pass
col = Collection("temporary.anki2")
This time we don't import anything, but add dictionaries to col.models that
we create from scratch.
A complete note type is a rather big dict, and I'll be honest with you, I really only understand the field and template parts. A little. For the rest it worked well for me to stick to default values (that I don't completely understand).
Let's start with the fields, stored in flds of the note type dictionary.
Each entry has a name, like Front for {{Front}} in the template, and an
ord, which is the sorting order of the field. The field with ord 0 is
special because Anki requires that it is non-empty. Then there are a couple
values that look styling-related, though I'm not sure what they do exactly. You
don't really need them, since you can use CSS. A complete field looks like
this:
{
    'name': "Front",
    'ord': 0, # Field No.1, this one must always be non-empty
    'id': 0, # must be unique
    # not sure what the rest does, just use CSS for styling
    'sticky': False,
    'rtl': False,
    'font': 'Arial',
    'size': 20,
    'description': '',
    'plainText': False,
    'collapsed': False,
    'excludeFromSearch': False,
    'tag': None,
    'preventDeletion': False
}
We already know qfmt and afmt of the templates in tmpls. Templates
additionally have an ord, analogous to the fields. Again, the extra fields
look styling-related and a complete template would look something like this:
{
    'name': 'English to Japanese',
    'ord': 0,
    'qfmt': front_html,
    'afmt': back_html,
    'bqfmt': '',
    'bafmt': '',
    'did': None, # this could maybe be the deck override option
    'bfont': '',
    'bsize': 0,
}
Combining fields and templates with a few more mystery fields, we can write down a full note type with a single template for translating from English to Japanese:
note_type = {
    'id': 0, # the 0 has no effect, the actual ID will be the timestamp at the time of adding the note type
    'name': "My cool note type",
    'type': 0,
    'mod': 0,
    'usn': 0,
    'sortf': 0,
    'did': None,
    'tmpls': [
        {
            'name': 'English to Japanese',
            'ord': 0,
            'qfmt': front_html,
            'afmt': back_html,
            'bqfmt': '',
            'bafmt': '',
            # this could maybe be the deck override option
            'did': None,
            'bfont': '',
            'bsize': 0,
        }
    ],
    'flds': [
        # Example
        {
            'name': "Front",
            'ord': 0, # Field No.1, this one must always be non-empty
            # not sure what this stuff does, just use CSS for styling
            'id': 0, # a unique ID, this can be the ord
            'sticky': False,
            'rtl': False,
            'font': 'Arial',
            'size': 20,
            'description': '',
            'plainText': False,
            'collapsed': False,
            'excludeFromSearch': False,
            'tag': None,
            'preventDeletion': False
        },
        {
            'name': "Back",
            'ord': 1, # Field No.2, can be empty
            'id': 1,
            'sticky': False,
            'rtl': False,
            'font': 'Arial',
            'size': 20,
            'description': '',
            'plainText': False,
            'collapsed': False,
            'excludeFromSearch': False,
            'tag': None,
            'preventDeletion': False
        }
        # … more fields like Rōmaji if you'd like them created
    ],
    'css': '', # instead of putting it into the HTML you could also set CSS here
    # note sure what the rest does
    'latexPre':'\\documentclass[12pt]{article}\n\\special{papersize=3in,5in}\n\\usepackage[utf8]{inputenc}\n\\usepackage{amssymb,amsmath}\n\\pagestyle{empty}\n\\setlength{\\parindent}{0in}\n\\begin{document}\n',
    'latexPost':'\\end{document}',
    'latexSvg': False,
    'req': [
        [
            0,
            'any',
            [ 0 ]
        ]
    ],
    'originalStockKind': 1
}
With the new note type dictionary stored in note_type, we can add it to our
collection and give it a predictable ID by re-setting the time for a block of
python code where we add it to the temporary Anki collection:
with fake_time("2025-04-07 18:45:00"):
    # add the note in the past (or the future)
    note_type_id = col.models.add_dict(example_note_type).id
We did it: a note type from scratch, with a stable ID. Now all that's left would be to export an APKG, but we don't have any cards yet. Let's add one using the new note type just for the sake of exporting:
# Step 4: add a card and deck to have something to export
note = Note(col, note_type_id)
# you need some sort of unique ID for Anki to know on the next import if you
# already have the note or not
note.guid = "test1"
# set values from the CSV, using the name of the field you chose in Anki
note["English"] = "tree"
note["Japanese"] = "木"
deck_id = col.decks.add_normal_deck_with_name("Test deck")
col.add_note(note, deck_id) # save the note to the collection
In the same manner, you could also also create lots of notes that you read or
generate with python code. Just make sure that the guid is stable.
And then, same as before, we write an APKG that we can import back into Anki:
col.export_anki_package(
    # anki fails if this is just an apkg filename without a dir,
    # with ./ it's fine
    out_path="./cool_new_template_from_scratch.apkg",
    options=ExportAnkiPackageOptions(
        with_deck_configs=False,
        with_media=True,
        with_scheduling=False,
        legacy=True,
    ),
    limit=None)
Let's run our script in the shell:
pipenv run python create_from_scratch.py
A new file cool_new_template_from_scratch.apkg will appear. Let's import it
into Anki using the same process as above and then try the Test deck. Cool,
it works!
 A card using a note type that we created from scratch in python, without a reference note type
If you run the script again and re-import, you'll see that no new note type will be created, but the previous one will be updated. With this approach, you can manage all aspects of your note type in a git repository without any binary files.
Ok, I'll admit that was quite a bit of work but think about the possibilities.
Either of these approaches allows you to manage any number of templates or fields from code. The ability to create APKGs from code allows you to test these in a new Anki profile or installation before you let them loose on the Anki you use day-to-day, and when they are fine, share with your friends. By using code to update templates, especially when working with a lot of them, you also avoid inevitable copy/paste mistakes.
In this post we focused on updating templates and only scratched the surface of managing notes, decks and cards from python code. We will explore these topics in a lot more detail in the next post, where our main focus will be to use python code to create a lot of cards. We will also have a look at calculating values in notes automatically, when we add Hiragana using python code, instead of looking this up manually.
With a way to manage templates (from this post) and a way to manage vocabulary (in the next), you'll be able to make some truly amazing decks in a reproducible manner that you could easily integrate into a continuous integration (CI) system to create and distribute your Anki packages.
If you had any trouble following along, consider checking the solution for this post on University of Vienna Gitlab.
I hope you enjoyed this second post of my series on Anki scripting crimes and that you will be back for more next week, when we will create a whole lot of cards.
Then you're in luck, this post is part of the series Anki scripting crimes: Doing what you have to do for advanced scripting on Anki cards and you can continue reading straight away with Anki scripting crimes, part 3: Creating a lot of cards with python code.
If you like the post or have thoughts on it, don't hesitate to write an E-Mail and tell me about it. You can reach me under philipp.pospischil@tapirbug.at.
Interested in more weird tech content? Check out all posts or check the home page.
Want to stay up-to-date? You can subscribe to this blog by adding the URL https://tapirbug.xyz to your favorite feed reader. Atom, RSS and JSON subscriptions are supported.